You are here: Home > Geovision Card Support > WebCam User Setup

Geovision WebCam User Setup

Geovision DVR CardGeovision systems can be set up for remote Internet access using Internet Explorer. By default, the main admin user of a Geovision system has remote access to the system as long as remote access is turned on. Many home and business users and want to add additional users so that multiple users can access the system remotely and not use the same account login ID and password. These setup instructions cover how to create additional users in Geovision and enable them for remote access to the system using the WebCam server.


  1. On your Geovision system screen, click on the Configure button (the one with the hammer and screwdriver on it) and select Password Setup, then Remote Authentication Setup.
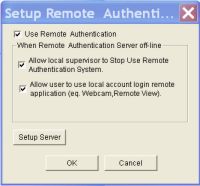
  2. Make sure that all 3 boxed are checked on the Setup Remote Authentication Server screen, then click OK.


  3. Click on the configure button again and select Password Setup, then Local Account Edit.
  4. On this Password Setup screen, click on the WebCam Tab towards the bottom of the screen and click on the New button to create a new user account.


  5. A new Account screen will open. Enter the ID, Password, Password Hint, and select the type of user that you want this to be. Typically type User will be selected unless you want to give this user other specail privileges.
    Press OK.


  6. You are them brought back to the main screen to configure access privileges for the user as seen below. Select the items that you want the user to have access to and press OK.


  7. Your new user will now have access to the Geovision WebCam server remotely using their own login ID and password.