Geovision Surveillance DVR Audio Surveillance Setup

The Geovision Surveillance DVR's feature the ability to record up to 16 channels of audio per DVR card. The audio can be configured to record based on volume sensitivity or around the clock.
Audio Surveillance Setup
The instructions below explain how to set up audio recording on a Geovision Surveillance DVR.
1. First, make sure there is a microphone(s) attached to the audio input(s) of the Geovision Surveillance DVR dongle.
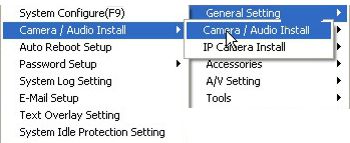
2. Then click the  button on the GV-System main screen. Select General Setting, followed by Camera / Audio Install and finally Camera / Audio Install. (Shown Below) button on the GV-System main screen. Select General Setting, followed by Camera / Audio Install and finally Camera / Audio Install. (Shown Below)

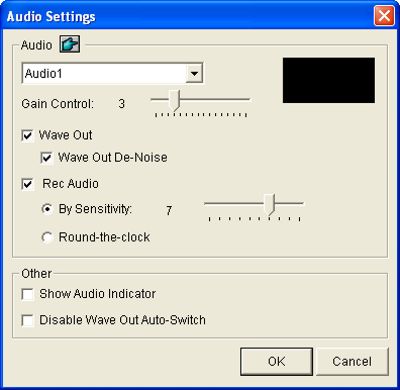
3. Now select an audio channel to be configured or click the Finger button to select all cameras. (Shown Below)

- Gain Control - Increases or decreases the gain of the microphone.
- Wave Out - Listens to the audio around the camera.
- Wave Out De-Noise - Reduces audio noise.
- Show Audio Indicator - Displays an audio volume indicator in the top left corner of the camera.
- Disable Wave Out Auto-Switch - By default, audio channel 1 is set to be the background sound even when you switch between video channels. To change the background sound, select the desired audio channel and select Disable Wave-Out Audio Switch. The selected audio channel will always be in the background.
4. Now click Rec Audio to enable audio recording. You can enable audio to record By Sensitivity, which will activate when the volume reaches the indicated level. The alternative is to record audio Round-the-Clock. (Shown Above)
5. Then click OK to apply the settings. Audio will now record based on your settings.
|
|
|


