iDVR-E Series Surveillance DVR Video Export & Playback
 The iDVR-E Series Surveillance DVR's allow users to export and playback recorded video on a PC. Users are able to export video to a USB memory stick, external HDD or a CD/DVD-RW. The video can be exported based on different recording modes as well. These recording modes include Motion, Alarm and Normal (Continuous Recording). Users can also choose to backup all cameras or a select few.
Video Export & Playback
Please follow the instructions below to export and playback video on the iDVR-E Surveillance DVR.
USB Memory Stick Backup
1. Insert a USB memory stick into the USB port on the front of the iDVR-E. Note: Please make sure there is enough space on the memory stick before commencing export.
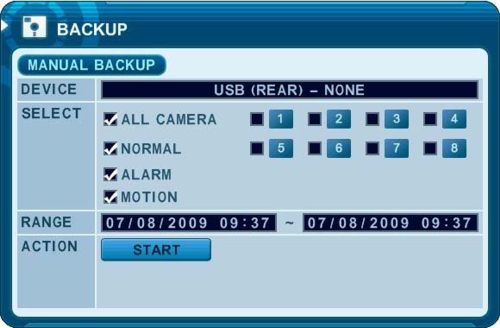
2. Press the Backup  button on the front panel of the DVR. The menu below should appear. button on the front panel of the DVR. The menu below should appear. 
3. Use the "+" and "-" buttons to select the device, in this case it will be a USB memory stick.
4. Then select the data you wish to backup.
- All Camera: Backs up all cameras
- Normal: Normal Recording Data
- Alarm: Alarm Recording Data
- Motion: Motion Recording Data
5. Now enter the range you would like to backup, it uses a 24 hour format (Example: 03/07/2012 9:12 to 03/07/2012 13:17). Then press Enter on the Start button to begin the Backup. 
Note: If there is insufficient space on the USB memory stick the backup will not proceed.
6. To ensure the DVR is backing up to the USB memory stick, you should see the USB icon turn blue during Backup. 
Note: While the DVR is backing up, please do not perform playback on the DVR.
7. After the Backup process is complete, the USB icon will turn white. Playback
1. Now insert the USB - memory stick into your PC.
2. Then go into the USB memory stick and double-click MCD Player. 
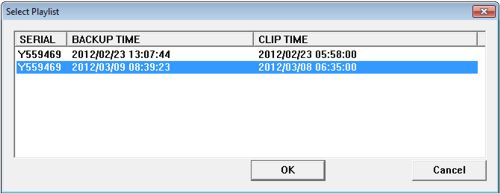
3. Select the backup file that you wish to view and press OK. 
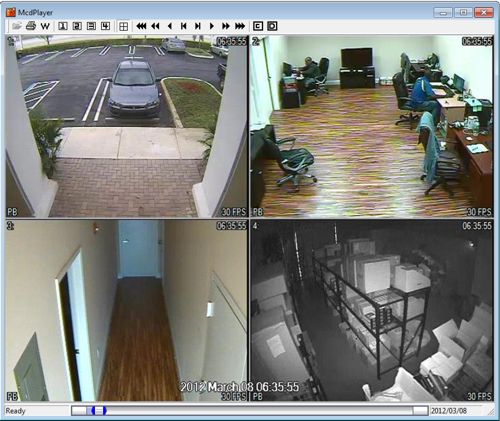
4. Your video will now be displayed as shown below.

External USB HDD Backup
1. Stop the recording on the iDVR-E.
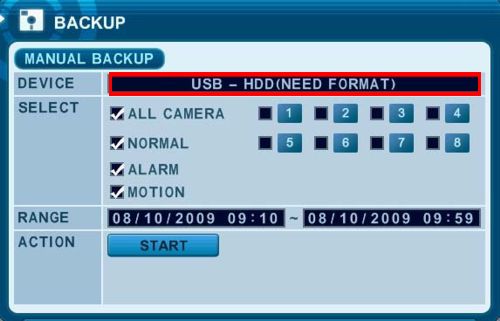
2. Format the USB HDD to FAT 32 format type. If the HDD is not formatted, the message below will appear. 
USB HDD Format
For assistance formatting the USB HDD, please follow the instructions below.
Press the Menu button on the front of the iDVR-E or on the included IR remote control.
Then go into the Disk sub-menu
Now select USB HDD under the Format tab and press Enter on the Start button.
The USB HDD should now begin to format. Note: It may take up to 30 seconds to completely format.
3. Once the USB HDD is formatted, press the Backup  button on the front panel of the iDVR-E. The menu below should appear. button on the front panel of the iDVR-E. The menu below should appear. 
4. Use the "+" and "-" buttons to select the USB - HDD under Device.
5. Then select the data you wish to backup.
All Camera: Backs up all cameras
Normal: Normal Recording Data
Alarm: Alarm Recording Data
Motion: Motion Recording Data
6. Now enter the desired range in a 24 hour format (Example: 03/07/2012 9:12 to 03/07/2012 13:17). Then press Enter on the Start button.  Note: If there is insufficient space on the USB - HDD the backup will not proceed.
6. To ensure the DVR is backing up to the USB - HDD, you should see the USB icon turn blue during Backup. 
Note: While the DVR is backing up, please do not perform playback on the DVR.
7. After the Backup process is complete, the USB icon will turn white.
Playback
1. Now insert the USB - HDD into your PC.
2. Then go into the USB - HDD and double-click MCD Player.

3. Select the backup file that you wish to view and press OK.

4. Your video will now be displayed as shown below.

External CD / DVD - RW Backup
Note: To backup to a DVD / CD - RW, the user must use an external USB CD / DVD burner device.
1. Plug the USB External DVD / CD drive into the front USB port of the iDVR-E.
2. Then press the Backup  button on the front panel of the DVR. The menu below will appear. button on the front panel of the DVR. The menu below will appear. 
Note: For CD/DVD-RW backup, the Select option is not available. The user must backup all data.
3. Use the "+" and "-" buttons to select the USB - CD/DVD-RW option under Device.
4. Now enter the desired range in a 24 hour format (Example: 03/07/2012 9:12 to 03/07/2012 13:17). Then press Enter on the Start button. 
Note: If there is insufficient space on the USB CD/DVD-RW the backup will not proceed.
5. To ensure the DVR is backing up to the USB - CD/DVD-RW, you should see the USB icon turn blue during Backup. 
Note: While the DVR is backing up, please do not perform playback on the DVR.
6. After the Backup process is complete, the USB icon will turn white. Playback
1. Now insert the CD/DVD-RW into your PC.
2. Then go into the CD/DVD-RW and double-click MCD Player.

3. Select the backup file that you wish to view and press OK.

4. Your video will now be displayed as shown below.

|


 The
The 


