You are here: Home > Support & Knowledge Base > iDVR-E CCTV DVR Support (Legacy Model) > Audio Surveillance Setup

iDVR-E Series Surveillance DVR Audio Surveillance Setup

iDVR Pro Surveillance DVR

The iDVR-E Series Surveillance DVR's support up to one channel of audio recording when a microphone is attached. Audio is always recorded in real time unlike video data that can be set to various recording modes. In addition to audio recording, users can also monitor and playback audio data.


Audio Surveillance Setup

The instructions below explain how to enable audio recording, monitoring and playback on the iDVR-E.

1. Make sure there is an audio device such as a microphone attached to the back of the DVR. Then be sure to connect the audio out port to a monitor with audio or a set of speakers. (Shown Below)


2. Now go to the DVR and press the Menu button on either the front panel or the included IR remote control. Then move down and press Enter on the Device icon.
3. Once in the Device menu, go to the General tab and scroll down to Audio Record. Here you will enable audio by using the "+" and "-" buttons and pressing Enter to save the setting.

4. Audio will now record on channel 1.

5. To monitor audio, simply bring channel 1 into full screen mode. You should now hear the live audio.

Audio Playback


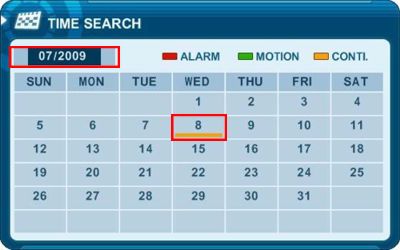
1. Press the Time Search button on either the front panel or the included IR remote control.
2. The Time Search menu will now appear. Here you will select the desired date using the arrow buttons and press Enter. (Shown Below)


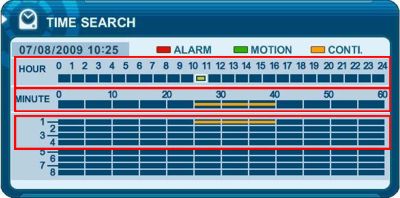
3. Next you will choose the desired Hour, Minute and Camera you wish to playback. (Note: If no specific camera is selected, all cameras will playback.) (Shown Below)


4. Once everything is selected, press the Enter button to start the video playback. If you selected only camera 1, you should hear the recorded audio. If you chose all cameras you will have to bring channel 1 to full screen mode to hear the recorded audio.

5. To exit playback simply press the Stop button.