Audio Surveillance Mic Setup
 Audio surveillance is easy to setup using CCTV Camera Pros surveillance microphone, CCTV cables with audio, and an audio capable surveillance DVR or Geovision surveillance system. To setup audio for your video surveillance system, CCTV
cables with an audio wire need to be used. Our standard plug and play
cctv cables only come with a video and a power lead. For audio to be used, you need cables with power, video, and audio like these: CCTV cables with audio and an audio surveillance microphone. Surveillance microphones can be added to any of our systems. Audio surveillance is easy to setup using CCTV Camera Pros surveillance microphone, CCTV cables with audio, and an audio capable surveillance DVR or Geovision surveillance system. To setup audio for your video surveillance system, CCTV
cables with an audio wire need to be used. Our standard plug and play
cctv cables only come with a video and a power lead. For audio to be used, you need cables with power, video, and audio like these: CCTV cables with audio and an audio surveillance microphone. Surveillance microphones can be added to any of our systems.
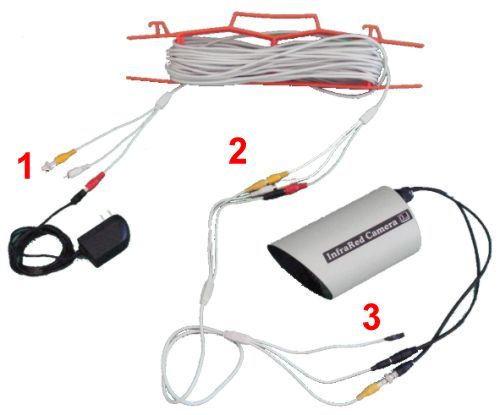
Using the below picture as a reference, connect your surveillance microphone to your CCTV cables and DVR.

- Connect one end of your CCTV cables with
audio to the power source for your security camera and to your DVR.
The power cable (red) connects to the power supply that your security
camera came with. If you are using a power supply box, the power cable
will plug into a DC power lead. The video cable (yellow) will need a
RCA to BNC converter attached to it in order to connect to one of the
video inputs of your DVR. The audio wire (white RCA) will connect to
the corresponding audio channel on the back of your DVR.
- Connect your CCTV cables to your surveillance microphone by connecting the corresponding wire colors. Please note that the power cable on the microphone may be black so for power you will match a red cable to a black.
- Connect your surveillance microphone to your security camera. The video wire (yellow) needs a BNC converter attached to it in order to connect to the camera's BNC female connector.
- Secure the microphone to a location on or near your security camera using tape or a wire zip tie.
- Enable audio recording and playback on your DVR following the below instructions.
Audio surveillance DVR Setup
|
|


