 |
 |
 |
 |
Please Note: The Vivotek PTZPRO-PZ6114 has been discontinued and is no longer manufactured by Vivotek.
Wireless Network PTZ Camera with 802.11G. Wireless Dual-Codec Network Camera with Pan/Tilt/Zoom, PZ6114 is a powerful surveillance system connecting to a wired/wireless Ethernet connection to provide remote high-quality video and audio. The pan/tilt/zoom function that can be controlled through the Internet or the included IR remote control extends the camera practicability and application. Users of PZ6114 can easily access it via an Internet Explorer browser, receiving surveillance video & audio from anywhere anytime.
Features
- Wired & Wireless Network PTZ Camera Controls
- Access camera & Controls from Internet Explorer Browser
- MJPEG and MPEG-4 Video Compression Selectable
- Motorized Pan/Tilt/Zoom (10X Optical Zoom Lens and 10X Digital Zoom)
- Integrated Two-way Audio
- Optimized Synchronization of Audio and Video
- 802.11g Wireless Connection
- Supports UPnP and Dynamic IP (DDNS)
- Intelligent Motion Detection Recording
- Pre and Post Alarm Snapshots
- Digital I/O for Sensor and Alarm
- Low Light Mode Down to 0.05 Lux
- 16-CH Video Recording Software Included
Follow these instructions to setup the PZ6114 camera on your network and to access remotely over the internet.
-
Download the latest installation wizard software for this camera here: PZ6114 Installation Wizard. You may choose tosave the file or to run the file. A setup program will launch and when complete, an icon to launch the wizard will be placed on your desktop.
-
Using an ethernet cable, plug your PTZ camera into your network router or switch. Even if you are setting up your camera for wireless access, you must first access the camera wired to your network before you can establish wireless connectivity. After your camera is connected to your network, plug the camera power in. The camera will run through an initiation cycle.
-
After the camera is done cycling on double click on the Installation Wizard 2 icon on your desktop as seen below.

-
The PTZ camera installation wizard will launch an analyze your network to see if any network PTZ cameras are connected. Click on the next button.
-
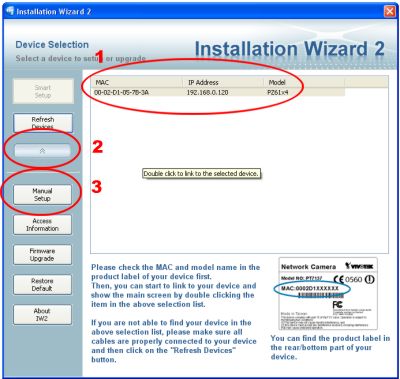
On the next screen you should see your PTZ camera in the Installation Wizard screen as seen below and noted next to the number 1. Click on the camera MAC address so that your cameras entry on that screen is highlighted.

If the menu is not already expanded, click on the arrow noted above by the number 2. Then click on the Manual Setup button.
-
On step one (System) of the setup wizard,enter a password for your camera in the Password field and in the Confirm Password field. Also Select Synchronize with computer time if you want your camera to keep its time in sync with your computer. Click Next.
-
On step two (Network Setting), uncheck the Get IP by DHCP server so that you do not get a new IP address each time that your PTZ camera reboots or you loose power. If the IP address in the that was obtained is outside the normal range of IP addresses that your DHCP server assigns, you may change the IP address to one that is in range and available. Click on the Next button.
-
CCTV Camera Pros recommends that you skip Step 3 (DDNS). We have found that setting up Dynamic DNS service through DynDNS.com in your router is much more reliable. If your Internet connection uses a static IP address, you can skip the DDNS setup completely. You can also skip the DDNS setup if you do not plan on accessing your camera from outside of your network (LAN). Check with your ISP and ask them if your connection uses a static or dynamic IP address.
-
If your connection uses a dynamic IP and you plan on accessing your PTZ camera remotely over the Internet, click on the following links to setup dynamic DNS service:
Setup a free DDNS account
D-Link Dynamic DNS Setup
LinkSys Dynamic DNS Setup
-
This step is also only needed if you will be accessing your camera from outside of your local area network. You must setup port forwarding on your router to allow access to your camera from the Internet. Click on the below links to setup port forwarding. You will use the IP address from step 7 to configure your port forwarding rule.
LinkSys Port Forwarding setup instructions
D-Link Port Forwarding setup instructions
-
Click on the Next button on the Installation Wizard. The wizard will ask you if you want to setup the wireless configuration. If you are setting up your camera for wireless access, click yes.
-
To complete step 4 (Wireless), you will need to access your router to lookup the options used for your wireless network. These wireless settings are typically under a wireless setup section of your router. CCTV Camera Pros has successfully tested a D-Link router and a LinkSys router with the PZ6114 PTZ camera.
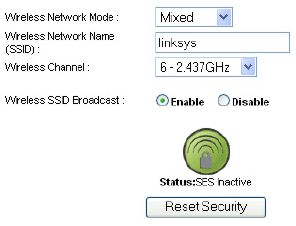
Linksys Router Setup - Access your linksys routers and click on the wireless link, then select Basic Wireless Settings. Your settings should look like the below picture. Note the SSID and channel that your router is broadcasting wirelessly on.

On the PTZ Installation wizard screen, fill in the SSID, select Ad-Hoc for the wireless mode, and choose the channel that matches your router.
Click on the Wireless Security Link and make sure that Security Mode is set to disable. Note, you may be able to get the wireless access working as we have done with D-Link routers below but we have been unseccessful at this time with LinkSys.
On the PTZ Installation wizard select none in the Encryption dropdown box. Then Click Next.
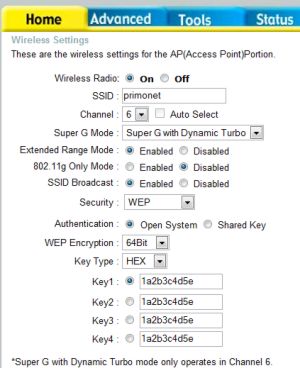
D-Link Router Setup - For D-Link routers, login to your router and lookup your wireless settings. On your D-Link router screen select the home button, then select Wireless. The screen should look like the below one for D-Link DIR-624 routers.

The above settings were used to successfully setup wireless access to the PTZ camera. Using the above settings foll out the fields on step 4 of the Installation wizard. A) Fill in the SSID B) Set wireless mode to Infastructure C) Choose the channel displayed on your router screen D) Choose Encrypt type WEP E) Auth Mode: Open F) Key Length 64 Bits G) Key Format: HEX H) Fill in your security Key(s). Click Next.
-
On step 5, click Next to apply all settings. A message may be displayed that says you can switch to ad-hoc mode now. This is fine. Press OK.
-
If all is successful, you will be brought to a screen that says click on the links to access your device. Click on the top link that says access from home. This link will open up Internet explorer and try to access your camera.
-
You will be prompt by Internet Explorer for your camera userid and password. Enter those and press OK.
-
You should now see your camera and all of the system controls on the left. This is the IP address that you will use to access your security cameras locally on your network.
-
To access from remotely over the Internet, use your static IP address that you got from your ISP or use the hostname that you setup using the dynamic DNS service.
-
Last, test wireless access to your camera by unplugging the ethernet cable from the back of it. See if you are still able to control your camera through Internet explorer.
Your PTZ camera should now be accessible over the Internet and if you also included the wireless setup, you should be able to access your camera over your wireless network.
- Features
- MJPEG/MPEG4 Compression Selectable
- Motorized Pan/Tilt/Zoom (10x optical zoom, plus 10x digital zoom)
- 802.11g Wireless LAN with WEP & WPA Support
- Optimal Synchronization of Audio & Video
- UPnP & DDNS Support
- Intelligent Motion Detection
- Pre/Post Alarm Snapshots
- Extended I/O for Sensor & Alarm
- Free-Bundled 16-Channels Recording Software
- Two-way Audio
|
|
 |
 |
 |
 |

|


