You are here: Home > Support & Knowledge Base > MPEG4 Surveillance DVR > Motion Detection Recording

Motion Detection Recording Setup - MPEG4 Surveillance DVR


MPEG4 Surveillance DVRCCTV Camera Pros MPEG4 surveillance DVRs have the option to allow users to set the DVR to only record when motion is detected by a security camera.  Users can setup the recording of one or more cameras to work in this way.  Motion detection recording allows you to only record footage when there is real activity in any of the areas that you are monitoring, making it easier to search for events recorded and also allowing your system to conserve disk space on your DVR's hard drive.

For these instructions we will be using the button controls directly on the front of the DVR.  The MPEG4 DVRs also allow motion detection to be configured using the DVRs remote control as well as the
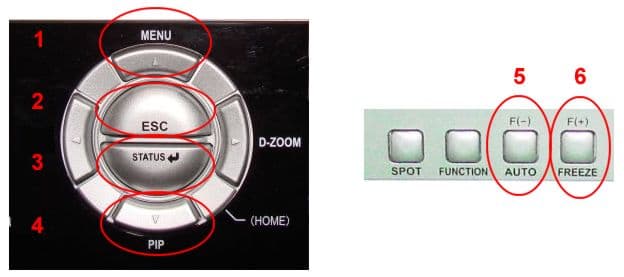
network/internet remote viewing  software.  The controls on the DVR that are referred to in these instructions are documented below.

  1. Menu Button and also used as Up Button
  2. ESC (Escape) Button
  3. Status Button
  4. Down Button
  5. Minus Button (-)
  6. Plus Button (+)

Setting up Motion Detection Surveillance Recording

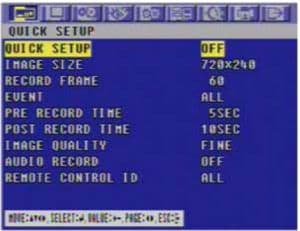
  1. Press the Menu Button.  The QUICK SETUP menu appears as seen below.

    MPEG4 Quick Setup Screen

  2. Press the (+) Button to set the QUICK SETUP to ON.
  3. Press the Down Button until EVENT is highlighted in yellow.
  4. Press the (+) Button until EVENT is set to MOTION.
  5. The PRE RECORD TIME and POST RECORD TIME control how long surveillance footage is recorded before and after motion detection is detected by a camera.  If you want to adjust these times use the  UP/DOWN and +/- buttons to adjust these times.
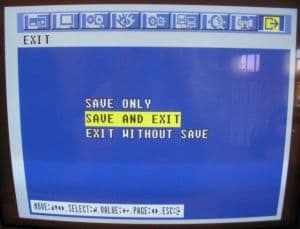
  6. When you are done, press the ESC Button.  The EXIT menu will appear as seen below.

    MPEG4 DVR Exit Screen

  7. Press the Down Button until SAVE AND EXIT is highlighted.
  8. Press the Status Button
Your should now see the live camera view and motion detection recording is now enabled.